В блоге Altered Art новое экспресс-задание. И в этот раз мастер-класс веду я!!!
A new amazing challenge started in Altered Art challenge blog . And I'm author of current tutorial for this chal.Все,
кто знаком с моим творчеством, знают, что больше всего я люблю шебби 
И конечно же мой МК тоже получился в этом стиле! Я хочу показать Вам
как сделать такой комодик из спичечных коробков.
Everyone who's
familiar with my art knows what I prefer shabby chic And of course I
made a tutorial in this style! I want to show you how to make a set of
drawers out of match boxes.
 Для работы вам понадобится:
- пустые спичечные коробки 2 шт
- толстый картон (переплетный), лучше разной толщины 1 и 2 мм
- темно-коричневая и белая акриловые краски
- свечка
- наждачка или пилка для ногтей
- любые украшения на ваш вкус
For this project you'll need:
- 2 emtpy match boxes;
- thick cardstock, you'd better use cardstock of two thicknesses - 1 mm and 2 mm;
- dark brown and white acrylic paint;
- a candle;
- sand paper or nail file;
- any embellishments you like.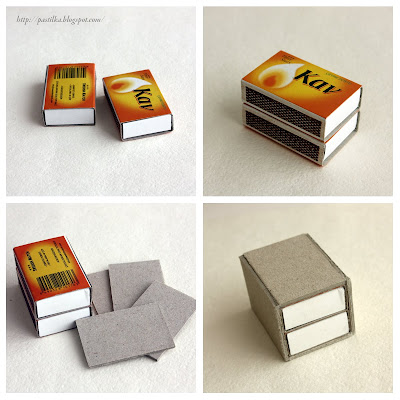
Возьмем два пустых коробка и плотно склеим их вместе.
Вырежем четыре стенки комодика из картона 2 мм:
- верхняя и нижняя = длина коробка х ширина коробка
- боковые = длина коробка х высота двух коробков + толщина картона (верхней и нижней стенки)
Обклеиваем коробки с 4х сторон, начиная с верхней и нижней части.
Тщательно проклеиваем и зажимаем торцы - важно следить, чтобы стенки сошлись как единое целое.
Незначительные выступы можно аккуратно спилить наждачкой или пилкой.
Take
two empty match boxes and adhere them to each other securely. Cut four
walls for the future 'furniture artcile' out of 2 mm thick cardboard: -
the upper side and the bottom one = length of the box x width of the
box; - side faces = length of the box x height of two matchboxes +
thickness of the cardboard (e.g. thickness of upper and bottom faces)
Glue the walls to the matchboxes, start with upper and bottom sides.
Adhere the edges securely and press them tightly - make sure that walls
connect perfectly as if they all were a single piece. Slightly bulging
parts can be polished away with a piece of sandpaper or a nail file. 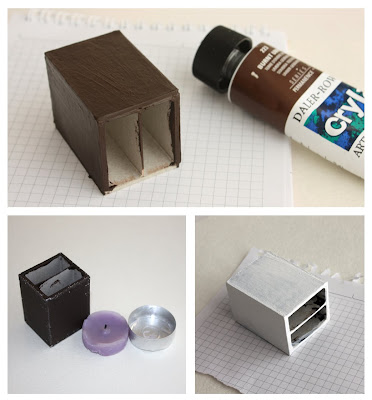
Покрасим заготовку темно-коричневой акриловой краской.
Если краска густая - она одновременно выступит и грунтовкой. Я замазала ей все щели между картоном и коробками.
Когда
краска просохнет берем свечку и хорошо натираем ей все углы и выступы с
внутренней и внешней сторон с заходом на стенки 1-2 мм.
Не забудьте смахнуть остатки парафина - не должно остаться белой крошки!
Затем покрываем белой акриловой краской. Можно красить в несколько слоев.
Paint
the whole thing with dark brown acrylic paint. If the paint is thick
enough it will be a base coating at the same time. I covered all slots
between the cardboard and the matchboxes with it. When the paint dries
take a candle and rub it against all corners and touch the side walls
too. Dust away the remains of the wax - no white crumbs should be left
on the surface! Then cover everything with white acrylic paint. You may apply a few layers.
Пока сохнет краска (можно начать еще на этапе пока сохнет коричневый слой) займемся ящичками.
Из картона 1 мм я вырезала по 3 прямоугольника на каждый коробок.
Первый, который клеится на сам коробок - чуть больше него по длине и ширине (лучше предварительно замерить).
Стенки
ящиков должны слегка заходить на заготовку, но при этом между ящиками
должен быть зазор. Последующие прямоугольники чуть меньше предыдущих.
Склеиваем
3 части вместе и наклеиваем на коробки. Для этого лучше вставить ящички
в заготовку и приклеить прямоугольники в закрытом положении.
While
the paint is drying (you may start during the drying process of the
brown layer) let's take up the drawers' decoration. I cut three
rectangles from 1 mm thick cardboard for each matchbox. The first one
should be adhered to the matchbox - it should be a little longer and
wider than the box (you'd better measure it before cutting). Walls of a
drawer should be slightly bigger than the blanks, but there should be
some space left between the drawers. Next two rectangles should be a
little smaller than the previous ones. Glue three parts together and
adhere them to the matchboxes. You'd better insert the drawers in the
set and glue the rectangles to the drawers when they're closed.
Проделываем с коробками ту же процедуру - красим коричневой краской, натираем свечкой и красим белой краской.
Когда все хорошо просохло, начинаем самую интересную часть процесса.
При помощи мелкой наждачки или пилки нужно стереть краску в тех местах, где был парафин.
Действуем
аккуратно - если протереть до картона, он замохриться и будет выглядеть
не очень красиво. Трем без фанатизма, состаренность должна выглядеть
естественно, кое-где достаточно коснуться лишь слегка.
Коричневой краской немного затонируем комодик, чтобы он выглядел действительно старым.
Repeat
the painting steps with the drawers - apply a layer of brown paint, rub
a candle and paint with white acrylics. When everything's dry to touch,
we begin the most intriguing stage. Use a piece of sand paper or a nail
file to wipe away the paint on the waxed places. Be gentle - you don't
want to sand away everything to the core; sanded cardboard doesn't look
very attractive. Don't be too passioante with sanding, it should look
natural, so some places need only a light touch. Apply some brown paint
to make the drawer set look really old and distressed.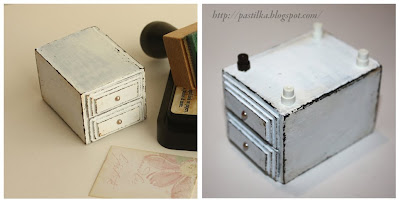 Украшаем комодик по вашему желанию.
 Сверху я наклеила кусочек скрап-бумаги шебби-расцветки.
А снизу приклеила ножки из скрученных полосок, тоже их состарив.
Поставила на комодик горшок в технике квилинг.
В качестве
бонуса я хочу показать как его сделать - мы же обещали вам сюрпризы!
Для участия в розыгрыше делать его НЕ ОБЯЗАТЕЛЬНО, но мне будет приятно!
Для горшка без подставки понадобится:
- клей ПВА
- шило или зубочистка или инструмент для квилинга
-
полоски для квилинга 3 мм длиной 27 см - 18 штук (можно нарезать самим,
из бумаги окрашенной в массе, плотностью примерно 130 гр)
Embellish
the set as you like. I glued a piece of shabby scrap paper on top. And
on the bottom side I glued the legs made out of quilled strips,
previously distressed. And I topped the set with quilled flower pot.
As a bonus I'm going to show you how to make a flower pot - we promissed some surprizes for you! It's not obligatory for the challenge, but I'll be pleased if you make it For this pot you'll need: - white glue;
- a piercer or a toothpick or a quilling tool;
-
quilling strips 3 mm wide - 18 pieces 27 cm (11" long (you can cut
them yourself, use pulp-colored paper with 130 g/m^2 density) 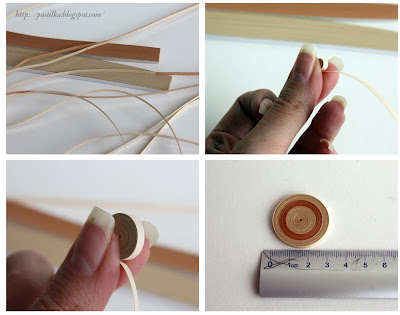
Склеиваем все полоски вместе в одну длинную.
Начинаем скручивать. Крутим довольно плотно и равномерно.
Склеиваем только один раз, когда дойдем до конца.
Из 18 полосок у меня получился диск 3 см -такой будет диаметр горшка сверху.
Glue
all 18 strips in a single long one. Begin to quill. Quill evenly and
tightly. In the process of qulling apply glue only once - at the very
end to adhere the tip. I made a disc 3 cm (2 1/5" in diameter - that
will be the diameter of the pot top. 
Сформируем дно - чем меньше дно, чем выше и у'же будет горшочек.
Чтобы дно было ровным его можно выравнять на столе или другой поверхности.
Дальше
нужно действовать двумя руками, я не могла сфотографировать, постараюсь
объяснить. Оба больших пальца нужно расположить как на второй картинке.
Представим, что горшочек из глины или пластилина и начинаем как бы
выдавливать его, равномерно двигаясь по кругу.
Тут
будет понятно почему было важно скручивать диск туго и - слишком
свободные места будут очень мешать. Если с первого раза не получилось -
можно снова сложить в диск и попробовать сначала.
Когда вы получите горшок, который вас устроит - внутри нужно все хорошо промазать клеем и высушить.
Form
the bottom - the smaller the bottom the taller and the narrower will
the pot be. Make the bottom flat with the help of your working surface
or any other flat surface. Then you need to use both of your hands, so I
couldn't take photos and I'll try to explain it.Place
both thumbs as it's shown on the second picture. Imagine that your pot
is made out of clay and press the center inside, slowly and evenly going
round and round. Now you can understand why you should have quilled it
tightly - loose places may spoil the work. If you failed to make it from
the first attempt, get it back into a flat disc and try again. When
you'll get the pot you like cover the inside of it with glue and let it
dry.
Мне нравится покрывать готовый горшочек снаружи прозрачным кракелюром -
выглядит как будто потрескавшаяся эмаль и нивелируются границы бумаги.
Цветы
(розы Wild Orchid Crafts 1 см) я закрепила на силикон, можно оставить
их не закрепляя или воспользоваться пластилином или флористической
губкой.
I like covering the pot with clear crackle varnish - it looks more real and the edges of paper strips are concealed. Flowers
(roses by Wild Orchid Crafts 1 am) are adhered with silicon glue. You
may leave them as it or use a piece of clay or floristic sponge.
Если
процесс вам показалось очень сложным - не пугайтесь, на самом деле все
очень просто и увлекательно. На все вопросы отвечу в комментариях или по
почте
pastila собачка mail точка ruIf the
process seemed to be very complicated - don't be afraid, it's very easy
and interesting. I'll answer all of your questions left below this post
or email to pastila at mail dot ruИ еще фотки:
На "письме" штампик post card.
Хотела еще сфоткать с открытыми ящичками, но забыла. А они хорошо выдвигаются и вполне функциональны!
Источник http://pastilka.blogspot.com/search/label/%D0%BC%D0%B0%D1%81%D1%82%D0%B5%D1%80-%D0%BA%D0%BB%D0%B0%D1%81%D1%81%5Ctutorial
-
-
07.11.2011 в 10:44-
-
07.11.2011 в 11:14-
-
07.11.2011 в 14:15-
-
07.11.2011 в 14:43-
-
07.11.2011 в 15:52-
-
07.11.2011 в 17:24-
-
08.11.2011 в 15:51-
-
17.11.2011 в 18:47-
-
17.11.2011 в 18:50«- любые украшения на ваш вкус
Цветы (розы Wild Orchid Crafts 1 см) »
-
-
18.02.2012 в 11:01-
-
15.03.2012 в 22:32